that’s the simple and easiest method to bypass google account verification from your Lenovo P1 Android 6.0.1, so let’s start how to do that?. Follow this method Step by


Step 1 Tap to “Back button” from your mobile “emergency dialer” tab. Bypass Lenovo p1, FRP unlock, Lenovo P1 data factory reset, developer option,
Step 2 Tap to “Next” from “Lenovo welcome” screen.
Step3 Now, you’ll be on “Network Settings,” tab, from there you’ve to “Turn on” WLAN Connection, from there you’ll have to choose your “Wifi connection SSID” and give the password and connect your mobile to “Wifi Connection“, after that tap to “Next“.
Step 4 Now, it will be on “SIM car missing” tab, and from there tap to “Skip” and then “Skin anyway“.
Step 5 Now, it will lead you “Verify your account” tab, and from there, you don’t need to enter any Gmail account, simply click to “Back” from left side bottom screen till get on “Select WLAN” tab.
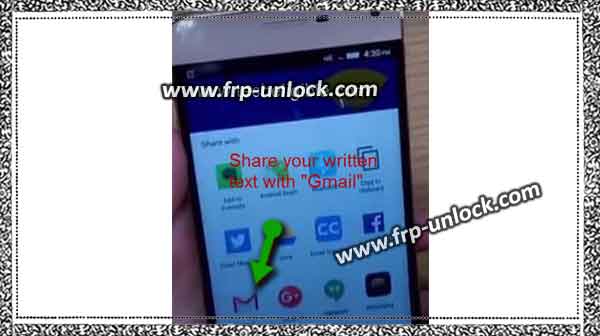
6/Now on that screen, you’ve to tap on “Other Network” and type there anything you want, and then long press on that text till “Copy, cut, share” options appear, and Now, select “Share” from there. Bypass Lenovo p1, FRP unlock, Lenovo P1 data factory reset, developer option,
Step 7 Tap to “Add an email address“, and you’ll be lead to “Set up email” tap, select 2nd option from there of “Personal (IMAP/POP)” and after that type your outlook/yahoo email address there, after that it will take you to “account options” tap, and tap on “NEXT” from there, and it will lead you to “Your account is set up and email is on its way!” tab, hit on “Next” from there and again one more time “Next/Login“, till you get “Compose” Gmail options, as shown in find below screenshot.
Bypass Lenovo p1, FRP unlock, Lenovo P1 data factory reset, developer option, Factory Data Reset: and then hit on “<-” this back symbol from left top side corner, Now, you’ll be on “INBOX“, after that hit again from left top side corner, as shown in find below screenshot,
and then, tap on “Settings,“, and then tap on from top right side corner 3 dots, and then tap on “Manage Accounts“, Now, you’re on “Settings,” screen, scroll up from there to find out “About Phone” which is usually on the bottom, and then tap on “Device Information” after that tap on “Build number” 5 to 7 times rapidly till you see “Developer option is enabled“, after that go back, and you’ll see there in Settings, “Developer Option“, just tap on that, and then from “Developer Options” you’ve tap on “enable OEM unlock” to enable that, and then again “Go Back” to Settings,, and tap on “Backup & Reset” option, and then, scroll up to search out “Factory Data Reset“, once you found this option, tap on that, then tap on “Reset this phone“, and then tap on “Erase Everything“.
Bypass Lenovo p1, FRP unlock, Lenovo P1 data factory reset, developer option, Bypass Lenovo p1, FRP unlock, Lenovo P1 data factory reset, developer option,
Caution: make sure, you’ve at least 50% Battery charging, and it will take several minutes to be accomplished “data factory reset”, after completing this process, you can give all your desired setting, as you give to brand new set, and Congratulations, Now, your mobile is ready to use, add your new Gmail account, and you’ll have access to all apps, and functions.
Sharing is caringSo, Share it on Soc